Ok... here is how to retexture an EA hair using GIMP & CTU.
You will need:
GIMP:
http://www.gimp.org/GIMP DDS PLUGINS (YOU MUST HAVE THESE!!!):
http://code.google.com/p/gimp-dds/CTU:
http://www.modthesims.info/download.php?t=364926**NOTE** If you are having trouble installing the plug-ins, follow this tutorial:
http://shyneinnocence.wordpress.com/2011/01/28/tutorial-installing-gimp-plugins/Part I - The Diffuse MapThe first stop to texturing is to decide on what texture you are going to use to replace the old one. This is a texture I found on the internet, and I used to retexture the hair my avatar is using


For a start, make a new folder, call it TUTORIAL HAIR, and save this texture into it. It will make things a hell of a lot easier and faster for you and me.
I generally try to use textures that are at least 250 pixels wide, but beginners are best to use textures that are large, like this one, so they can paste it over the whole texture. You will see why soon enough.
Ok, now you have your BASE TEXTURE, find a hair you want to retexture using the CTU. This only allows you to retexture BASE GAME hair, but that is an excellent place to start as they always look a little bad no matter what texture you use, but the more you play around with them to improve them the more you learn.
For the purpose of this exercise, we are going to use a bob.
The CTUOk. This is the tricky part. It will take you a long time to get your head around all the different programs used to fiddle with the files. CTU is pretty straight forward though.
To select the Bob, open up CTU. Now select the Age (ADULT – no young adult doesn’t work), Gender (FEMALE), Type (HAIR). You’ll come up with lots of ugly base game hairs. Scroll down until you find this one:

Ok, this is the bob we want to use. Now hit the Designs tab. This is the tab you will use the most.
Now click the Textures tab. It’s blank. Click on Add New Design, Add New Blank. It will load up this grid:

Now we’re cooking with gas. Ok, let me explain the parts of the hair I use (maybe other creators know how to use other parts of the hair, but I don’t).
Clothing Specular: My favourite part of the hair. It makes the hair either really shiny or really dull. As you all know… I like it shiny.
Control Map: This part of the hair controls the colouring, or where and how the hair colours.
Diffuse Map: This is what you’ll be learning about for now. It is how the hair renders.
Click on the strings of letters and numbers next to Diffuse Map. Then click FIND on the bottom left. It will come up with a screen like this:

Click on EXPORT. Save it as Bob_DM or something like that so you know what it is lol
It will save in DDS format. That is why we needed the DDS plug in for GIMP.
GIMPGIMP took me forever to master. But once I did, it is the easiest thing ever to use.
Open up Bob_DM.dds in GIMP. It will look like this:

Ok, now open the texture in GIMP as well. It may not open in front of you but will be minimized. Click on the file in the toolbar and it will come up on the screen. Now, this is the easy peasy part.
Hold CTRL + A. You will have selected the whole texture. Release CTRL + A. Hold CTRL + C.
Now you have copied the texture, open up Bob_DM.dds. Now press CTRL + V. You should have pasted the texture over the original image. If you're using the texture I gave you, you'll need to rotate it 90 degrees clockwise. To do this, go to LAYERS, TRANSFORM, ROTATE 90 DEGREES CLOCKWISE.
I reshaped my texture to fit over the entire texture underneath, using the scale tool, which is circled in the picture below.

See the little arrow next to Mode: Normal? Hit that. The very bottom layer effect is the one we want. It is called Value. Select it. Your image will now look like this:

Now, to finish off this retexture, select the Layer menu at the top of the screen. Select Anchor Layer. There. You’re completely done. Just press CTRL + S to save your texture. You may want to adjust the brightness and contrast if you are using a different texture - I've adjusted this one so it's perfect (in my world lol).
Back to the CTUGo back into the CTU. The string of numbers and letters next to Diffuse Map should still be selected. On the bottom left of the screen is the Replace button. Hit that. Find your Bob_DM.dds image and import that.
Now hit Commit at the bottom right.
Ta da! Go to the Meshes tab. Rename the mesh. Call it ShyneSuckyRetexture if you like. Make sure you hit COMMIT.
Now for the SPECULAR and the CONTROL.
CLOTHING SPECULAR(PICS COMING)
Ok, so we’ve got our texture down-pat.
Now we want to do the hair SPECULAR. This is the shininess of the hair. In the beginning I set it way too high – everything in CAS looked like plastic. But I’ve learned how to make it sharp and effective now. Here is how.
Step 1.Open up your Diffuse Map that you just retextured in GIMP.
Step 2.
Hit CTRL + A, then CTRL + C.
Step 3.
In CTU, remember how we exported the Diffuse Map from the hair? Well now we have to export the CLOTHING SPECULAR (as circled). I usually just called it CS and save it in the same folder as I saved the Diffuse Map. Open it up in GIMP.
Step 4.
Now you have the Clothing Specular opened up in GIMP. Hit CTRL + A, then hit delete. You should have a blank canvas. Fill this in with black. Now hit CTRL + V. Ta-da!
Step 5.
Go to COLOURS, BRIGHTNESS AND CONTRAST. Ok, so some may say I’ve set it too bright (too much white), but I like it a bit shiny. If you prefer a more soft look, have your white areas a little darker by decreasing the brightness further. Hit OK when you’re happy with how bright / dark your Specular is.
Step 6.
Go to LAYER, ANCHOR LAYER. And you’re done! SAVE!
Step 7.
Don’t forget to replace the CLOTHING SPECULAR in CTU with the one you just made!
Clothing Speculars are very quick and easy. I always do them as soon as I’ve finished my DIFFUSE MAP.
CONTROLS(PICS COMING)
Ok... we’ve done our texture and our specular. It’s lovely and soft and shiney now... but it still has a horrible way of colouring. My technique is a bit... odd, I don’t think anyone does it my way. But that’s ok! Because my way is the best way to get a control to perfectly match your texture
Step 1.
Still got your DIFFUSE MAP open? Well open it up again in GIMP.
Step 2.
Go to COLOURS, LEVELS. This sucker is really intimidating at first, but once you get the hang of it you’ll be a pro. Grab the middle tab thingie, as circled, and move it all the way to the right.
(PIC)
You’ll get something like this:
(PIC)
Step 3.
GREAT! Hit ok. We have the perfect amount of highlight vs. Dark. If you’re not happy with the amount of highlight that you’ve got left over, just jump into Brightness and Contrast and play with that Now it gets a bit complicated. Go to COLOURS, then hit INVERT.
Step 4.
Go to COLOURS, then COLOUR TO ALPHA. Click in the white rectangle. Move the colour sliders around until you get BLACK. I just grab the V slider and move it all the way to the left.
Step 5.
Hit ok. You should have a texture without any black in it, like this:
(PIC)
Right, so now... we go to COLOURS, COLORIFY... and pick red. We’re going to pick the area for the ROOTS :D Your image should look all red, something like this:
(PIC)
Step 6.
We need to delete the crap we don’t want to be the roots. So click on the rectangle tool, as shown, and down in the toolbox there’ll be an option to ‘FEATHER EDGES’. Check this. Now slide the radius bar all the way to the right, so the little box next to it says: 100.0.
Step 7.
Select the part of the image you don’t want to be roots. This is how I’ve done it:
(PIC)
You may wish to make your roots larger or smaller, depending on the effect you’re going for. I usually make them small, like so.
Step 8.
HIT DELETE!!! Ta da... You have roots.
Step 9.
Go back into CTU and export the CONTROL MAP as shown.
(PIC)
I usually just call it CONTROL.
Step 10.
Ok... open up your CONTROL in CTU. Ew... right? Select all and delete (CTRL + A, then DEL).
Step 11.
Go back into your newly made roots, which was originally your DIFFUSE MAP, if you’ve forgotten.
Hit CTRL + A, CTRL + C.
Step 12.
Go back into your CONTROL file. Fill it with black. Now PASTE (CTRL + V). Now anchor the layer (LAYERS, ANCHOR LAYER). TA DA! We have roots!!!
(PIC)
Step 13.
Guess what we’re gonna do now... TIPS! Go back into your DIFFUSE MAP. Hit CTRL + Z until you’re back at the completely white stage.
(PIC)
Now go to COLOURS, COLORIFY, but this time choose BLUE.
Step 14.
Again, select the part of the texture you don’t want to be tips and delete it. Make sure you’ve got FEATHER EDGES on and up to 100.0.
Step 15.
Select all, copy, and paste into your CONTROL. Anchor the layer. It should look like this now:
(PIC)
Step 16.
Go back to your DIFFUSE MAP. Hit CTRL + Z until you are back to the part before inverting the colour, as shown:
(PIC)
Step 17.
Now go to COLOURS, COLOUR TO ALPHA, and it should still be black in the box. Hit OK.
Everything disappears except for your highlights. Go to COLOUR, COLORIFY, and pick GREEN.
Step 18.
Copy and paste this green highlight into your CONTROL. Anchor the layer. TA-DA! You just did a CONTROL!
Step 19.
Save it and replace the CONTROL MAP in CTU with your CONTROL.
So... now you know how to do a full hair retexture using GIMP and the CTU. But what about other hairs, such as Peggy and NewSea? Tutorial coming very soon ;)


 [img]
[img]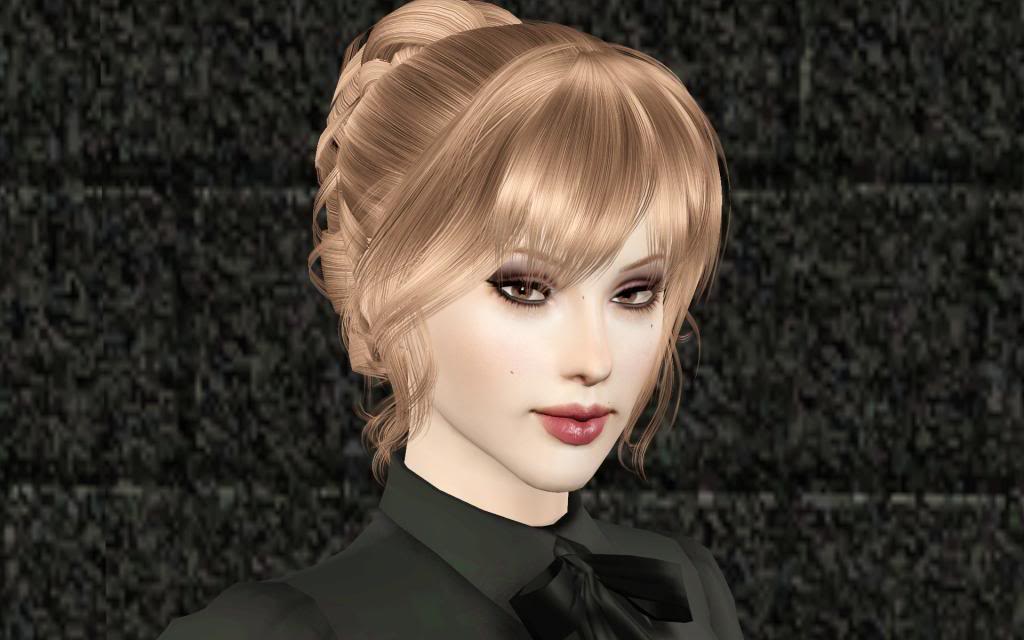 [/img]


